
I love my GoPro. It captures incredible moments, from bumpy mountain bike trails to serene underwater scenes. What I don't love is trying to get that media off their cloud service. If you've ever tried to back up your library, you've likely run into the same wall I did: the maddening 25-file download limit in the web interface. It turns a simple task into an evening of endless, tedious clicking.
Like any developer facing a frustrating limitation, I knew there had to be a script for this. My search led me to a promising GitHub repository, itsankoff/gopro-plus, which is designed to solve this exact problem.
But I hit another wall. The Docker version kept getting stuck without any logs, making it impossible to see what was wrong. The standard script instructions were confusing and didn't seem to work as intended, especially when I needed more control over the process.
After some digging, I found the solution. It wasn't about fixing the script itself, but about running it in a more direct, powerful way. In this post, I'll walk you through my personal method for reliably bulk-downloading your entire GoPro library.
Part 1: The Breakthrough—It's All About Environment Variables
My "aha!" moment came after a classic developer problem: I ran out of disk space. My first download attempt failed halfway through because my laptop's drive filled up. I cleared some space by moving the downloaded files to my NAS, but I needed a way to resume the download from where it left off. The script's standard options weren't working.
That's when I realized the key wasn't to use the wrapper script as-is, but to control its behavior directly by setting environment variables in the command line before running it. This method gives you full control over the process, including the crucial ability to start the download from a specific page.
Part 2: Getting Your Credentials (The Hard Part)
Before we can run the command, we need two key pieces of information: your USER_ID and your AUTH_TOKEN. This is the trickiest part of the whole process, but if you follow these steps exactly, you'll have them in a couple of minutes.
- Log into your GoPro media library at gopro.com/media-library.
- Open your browser's developer tools. (Usually
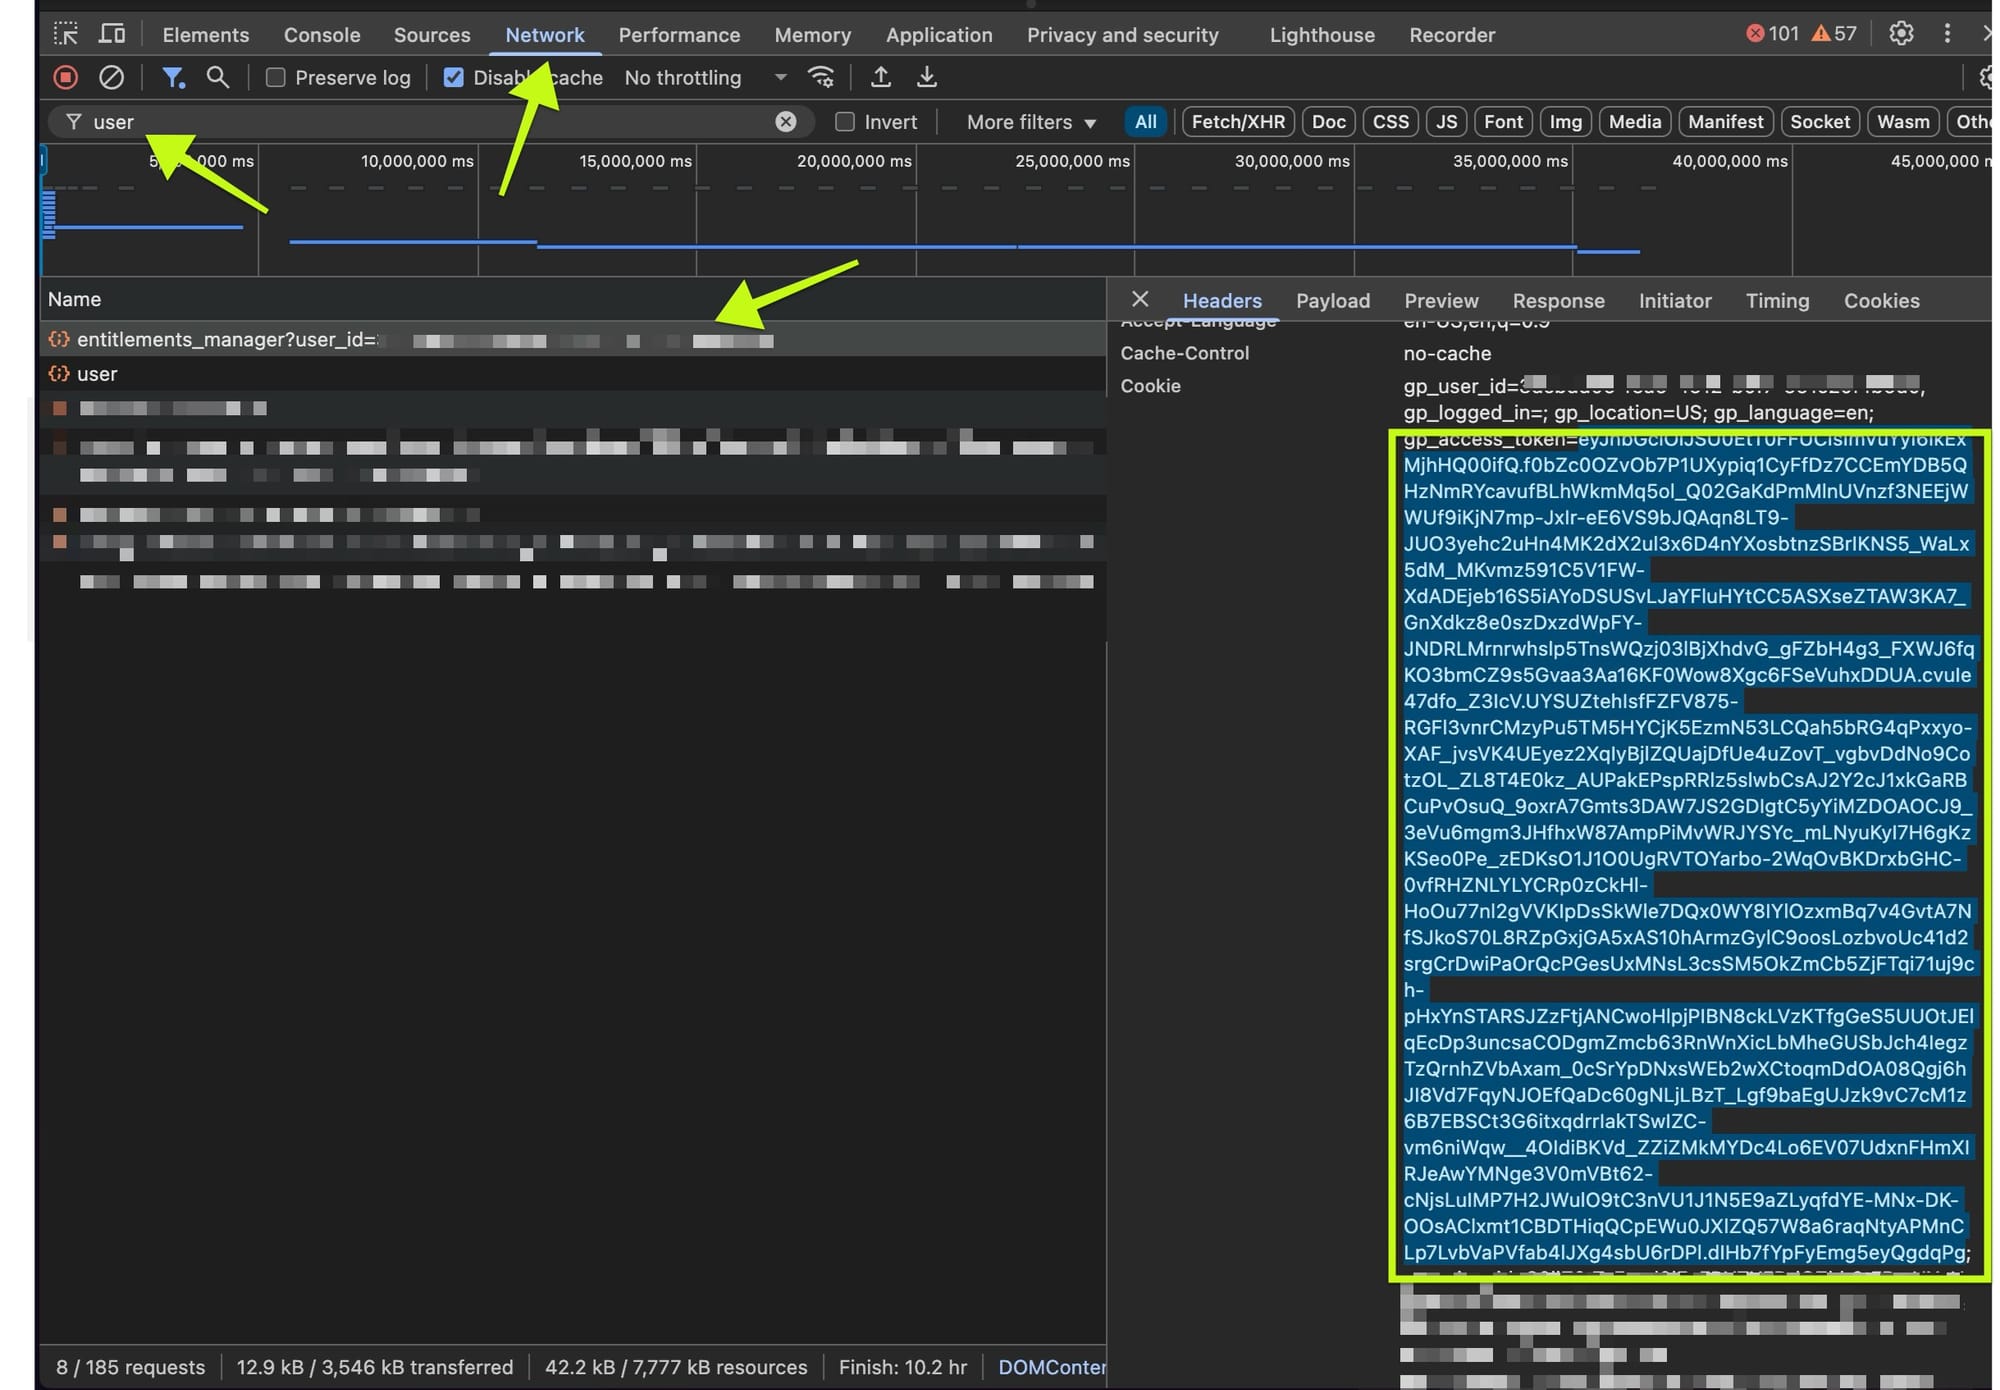
Cmd+Opt+Ion a Mac orCtrl+Shift+IorF12on Windows/Linux). Click on the Network tab. - In the filter box within the Network tab, type the word
user. This will help you find the specific network request we need. - You should see a request that includes
user_id=in its name. Click on it. - In the new pane that appears, make sure you are on the Headers tab. This shows all the technical details of the request.
- To find your USER_ID, look at the
Request URLat the top of the Headers tab. Youruser_idis right there in the URL. Copy it down. - To find your AUTH_TOKEN, scroll down in the Headers tab until you find the
Cookiesection under "Request Headers". This will be a huge, dense block of text. Carefully scan through it to findauth_token=. Copy the long string of characters that comes right after the equals sign.- CRITICAL NOTE: The different pieces of data in the cookie string are separated by a semicolon (
;). Do NOT include the semicolon in your auth token. Your token ends right before that semicolon.
- CRITICAL NOTE: The different pieces of data in the cookie string are separated by a semicolon (
Here is a screenshot I took to help you visualize where to find these values:
Part 3: The Working Command—My Personal Backup Script
Now that you have your credentials, we can put it all together. Here is the exact command I use to reliably download my entire library. I navigate to the cloned script's directory in my terminal and run this:
source .venv/bin/activate && \
export AUTH_TOKEN="YOUR_SUPER_LONG_AUTH_TOKEN_HERE" && \
export USER_ID="YOUR_USER_ID_HERE" && \
export PAGES=1000 && \
export DOWNLOAD_PATH=./downloads && \
export START_PAGE=1 && \
export PER_PAGE=30 && \
export ACTION=download && \
export PROGRESS_MODE=inline && \
./entrypoint.sh
Part 4: Deconstructing the Command—What Each Part Does
Let's break down what each part of that command does so you can customize it for your own needs.
source .venv/bin/activate: I use a Python virtual environment to keep my system's packages clean. This command activates it. If you don't use a virtual environment, you can completely ignore and remove this part of the line.export AUTH_TOKEN=...&export USER_ID=...: This is where you'll paste the credentials you just copied from the developer tools.export PAGES=1000: This tells the script the maximum number of pages of media to scan. I set it to a ridiculously high number to ensure it finds everything in my library.export DOWNLOAD_PATH=./downloads: This is simply the folder where the script will save your files. It will be created inside the script's main directory.export START_PAGE=1: This was the magic variable for me. When my disk filled up, I was able to look at the last page number the script completed, add one, and set it here (e.g.,export START_PAGE=61) to resume the download instead of starting all over. For your first run, you'll want to set this to1.export PER_PAGE=30: I found the default of 15 files per batch was a bit slow, so I doubled it to 30. This makes the script download more files at once, speeding things up considerably.export ACTION=download: This is critical. Without it, the script only lists your files. You have to explicitly tell it todownload../entrypoint.sh: And finally, this executes the script, which now uses all the custom settings we just exported.
Part 5: The Prerequisites—What You Need Before You Start
Here is a quick checklist to make sure you're ready to run the command.
- Clone the Repository: Open your terminal and run
git clone https://github.com/itsankoff/gopro-plus.gitto download the script. - Set Up the Environment (Recommended): Navigate into the new
gopro-plusdirectory. I highly recommend creating a virtual environment by runningpython -m venv .venv. Then, install the necessary packages withpip install -r requirements.txt. - Get Your Credentials: Follow the detailed steps in Part 2 above to get your
USER_IDandAUTH_TOKEN.
Conclusion: Taking Back Control of Your Media
With this method, I finally have a reliable, resumable way to back up my entire GoPro library. It's a bit more hands-on than a simple "download all" button, but it actually works, and it gives me the control I need to manage my own data effectively. It’s a perfect example of how a little bit of command-line knowledge can overcome the frustrating limitations of web interfaces.
I hope this guide saves you the hours of frustration I went through. Happy downloading!